Thursday, December 25, 2014

Monkey Bread

Monkey bread is one of those breakfast foods that really screams 'dessert'...but everyone looks the other way when it's placed on the breakfast table because it's too good to pass up.


In case you don't know what monkey bread is, I'll just say now that it has nothing to do with monkeys: it is basically composed of balls of sweet dough dipped in butter, rolled in cinnamon-sugar, and baked in a bundt pan after being drenched in more butter and sugar.
This is why we only eat it once a year...
...only on that day that is so special and anything flies, including dessert for breakfast, do we eat monkey bread. Christmas Eve we roll the dough balls, and Christmas morning it is a simple thing to pour the butter and brown sugar glaze on and pop it in the oven while everyone gathers around the Christmas tree.


I don't remember when we first started having monkey bread every Christmas, but it's a Christmas tradition that I love now. When we were little, we used to jump on helping make the monkey bread. I loved popping open the cans of biscuits, extracting the squishy dough, and forming it into little round balls for someone to roll in the cinnamon-sugar. Then in the oven, the magic happened: the balls of dough poofed up and the cinnamon sugar (or so I thought—it was actually the brown sugar-butter mixture) became a caramely, sugary crust. I could barely wait until it cooled enough to eat, and as soon as possible I would tear off the pieces with the most caramelized sugar and pop them in my mouth. Years later, I still love making monkey bread—and now I have found the perfect recipe.


For the past several years we have lived in foreign countries, so we haven't been able to use the usual canned biscuits to make it a super simple meal. Instead, we used a sweet dough recipe—but I felt that the recipe could be even better. So this year, I jumped in before anyone could even blink, and suggested trying this recipe from Sally's Baking Addiction. Based on previous experience with her recipes, I knew that the monkey bread would come out good, but I didn't know just how incredibly finger-licking good it would turn out to be! (And finger-lick you must because monkey bread is too good to waste a bit—plus you don't want sticky gifts, do you?)
No matter how many pieces of monkey bread I eat (that's code for A LOT), there always seems to be enough for everyone and we end up with extras.


See? Plenty for my breakfast on boxing day (that's December 26 to you Americans).

Tearing pieces off, my family thought it was a little under-baked at 30 minutes—on the other hand, I just sank into my chair with a happy smile on my face; I thought that it was perfectly soft and delicious, melting in my mouth, mesmerizing me into taking more and more.


We skipped the glaze on our monkey bread because it was plenty rich and sugary without it! However, if used, the glaze would definitely make the monkey bread taste like (my idea of) the perfect cinnamon roll.

This monkey bread is a real treat—warm, sticky, and delicious, melting in your mouth in a perfect blend of cinnamon and sugar.

Monkey Bread
Serves: 6-7 people

Notes:
This recipe can be made using biscuits (I have not tested this, but it should work–please comment on this post about your experiences if you try this method with this recipe).
Replace the dough with 3 cans of buttermilk biscuits (non-flaky). Skip all rising of the dough. Open cans of biscuits and cut each round into quarters. Dip in butter (optional), coat in cinnamon-sugar, pour on topping, and bake; make and pour on vanilla glaze (optional).
The Pioneer Woman has a great recipe using biscuits.

Recipe adapted from: http://sallysbakingaddiction.com/2014/06/30/homemade-monkey-bread-aka-cinnamon-roll-bites/

Wednesday, December 3, 2014

Pink Peppermint Snowcaps

Even after eating way too much food on Thanksgiving (and afterwards, thank you leftovers), I was ready to get down to Christmas decorating on the weekend. Our four nativity scenes went up (yes, four, you read that right), the stockings were hung, the tree was trimmed—and while I was helping put up our favorite ornaments, I was also starting off the Christmas baking.


Peppermint is my favorite Christmas flavor—well, peppermint and chocolate, really. They were just made to go together. Maybe that’s why when someone says “Christmas cookies”, these Pink Peppermint Snowcaps are one of the first two cookies that come to mind (the others are Swedish pepparkokker). Of course, I can never remember their name and just end up trying to describe their yumminess instead, but ultimately failing to do them justice. Anyway, for as long as I can remember, at Christmastime these cookies have been around at my house.


I don’t know about you, but I like to lick the spatula spotless. And since these were peppermint cookies—and, as I have already explained, that is my favorite Christmas flavor—I was happily licking away at a spatula covered in pink, ooey-gooey, peppermint flavored yumminess, dancing away to Christmas music. But then I realized it.
You know what I’m talking about—IT. That cookies have raw eggs...usually this wouldn’t concern me (what’s two raw eggs if I only eat a spoonful of the batter?), but this was no normal cookie dough. This was raw MERINGUE, which is, in its very essence, raw eggs!!! After realizing this, I poked my tongue out for one last guilty little lick, then dutifully, but sorrowfully, put down the spatula.


A few days later, I’m still alive, but, even if I had died, death by peppermint cookie doesn’t sound too bad—I mean, it could have been worse (death by raw salmon? no thank you, Russia).

I’m glad I survived, though…it finally snowed this week! While Michigan has already had three snow days, Russia has barely had a flake of snow in the same time. Hopefully it won’t be a repeat of last year’s rather pathetic winter. After all, I’ve only ever thought of Russia as snowy – insanely snowy (before moving here, that is). Maybe Russia will live up to the stereotype this year!


In the meantime, you need to make these cookies—before you get buried in gift wrapping.

Pink Peppermint Snowcaps
Makes: 24

Ingredients:
2 egg whites
1/4 tsp. peppermint extract
1/8 tsp. cream of tartar
dash of salt
red or green food coloring*
3/4 cup granulated sugar
6 oz. chocolate chips

Directions:
1. Preheat oven to 225ºF. Prepare a baking sheet by covering with parchment paper.
2. Beat egg whites, peppermint, cream of tartar, and salt until soft peaks form.
3. Add food coloring until mixture turns the desired shade of pink or green.
4. Add sugar gradually, beating until stiff, glossy peaks form.
5. Gently fold in chocolate chips.
6. Transfer to a pastry bag and squeeze teaspoon-sized amounts of batter onto prepared baking sheet.
7. Bake for 1 1/2 hours, until dry but not brown. Turn oven off and allow meringues to remain in the closed oven for a few more hours until completely cool.

*gel food coloring is preferable—liquid food coloring works as well (about 7-8 drops), but it may cause the meringue to be liquidy, so that peaks will not form as well.

Friday, October 10, 2014

Snickerdoodles

Do these cookies look like little mouthfuls of goodness or what?
If you answered YES then you are right! When I ate one of these snickerdoodles straight out of the oven, I was like yuuuuum that was good then I may or may not have stuffed two more straight into my mouth.


I mean, after waiting ten whole minutes for them to bake while amazing smells floated out of the oven, teasing my nose, how could I not eat multiple cookies? The smells just filled my head with visions of fall leaves, snuggly kitties, and warm drinks.
Also, it was probably a good thing that I made these snickerdoodles as a last-minute kind of thing on a school night, otherwise I would have just gone on munching them all day long. I’m telling you, they’re good.


So make some cookies, sit down with your warm morsels of goodness, and enjoy some cookie history—the best kind of history...

…Snickerdoodles are another one of those desserts that is shrouded in mystery. We know that they have been around from at least 1889, and were especially popular in Pennsylvania. But that’s about it—from here, it’s all opinion. Some say they originate from the German phrase Schnecke Knödel which means "snail dumpling". Another belief is that the name came from a series of tall tales in the early 1990s based around a hero named Snickerdoodle. Still others have even stranger theories—and they’re all just that, theories. So there you have it. A brief history of snicker doodles.


Enjoy these cinnamon-y little treats!

Snickerdoodles
Makes: 3 dozen
Time: 40 minutes

Recipe from: http://sallysbakingaddiction.com/2013/05/19/soft-thick-snickerdoodles-in-20-minutes/

Saturday, September 27, 2014

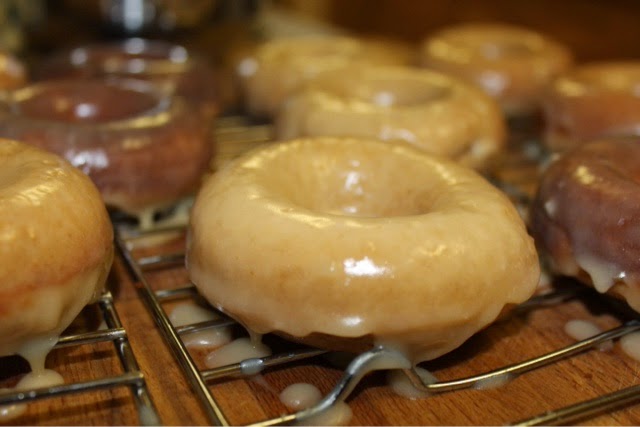
Spice Doughnuts with Brown Butter Glaze

Lately, it's been 60°F here in Moscow—fall seemed to come almost overnight, complete with a cold for me.
This horribly obnoxious cold started right at the beginning of the week, forcing me to suffer through five endless days of school with it. Within those five days, I had four tests, which meant that between sniffles, I had to quietly (and very awkwardly) blow my nose while avoiding eye contact with everyone in the otherwise silent room. Let's just say that it made for a long week, and I never thought the weekend would come. Miraculously, I was almost better by the time it did arrive, so then I could enjoy it by making us some fall donuts!


I think cats also know when fall has come. After keeping me warm during the night by cuddling with me, Kamber also kept me company in the kitchen, weaving in and out of my legs, tripping me up, begging for attention. Later as Mom was eating her fresh donuts on the couch, Kamber nosed her way onto Mom's lap. Kamber really seemed to want a bite of fall and some warmth!


These donuts have a cozy aroma...one bite of these and you'll get a mouthful of fall spices: cinnamon, allspice, ginger, and nutmeg. A yummy treat for a cold morning!

Spice Doughnuts with Brown Butter Glaze
Time: 35 minutes
Makes: 15 donuts

Recipe from: http://tutti-dolci.com/2014/09/spice-doughnuts-with-brown-butter-glaze/

Friday, September 12, 2014

Texas Sheet Cake

The first time I bit into a chocolatey square of Texas sheet cake years ago, I knew that someday I would have to make it myself. It sat in the back of my mind until I finally discovered that the Pioneer Woman has a recipe for it...I was so delighted that I made it almost immediately! All of her recipes are delicious…and usually pretty unhealthy too, and this one is no exception. However, this cake's heavenly flavor makes all that extra butter and sugar worth it.


The mystery behind Texas sheet cake: its name. People keep asking me, “why Texas?”.

The answer: I don’t know. Even wikipedia couldn’t tell me. *shakes head in disappointment*

I did find out, however, that this cake was quite popular in the South in the 1950s (no wonder there’s so much butter and sugar!). It actually has quite a few different names, one of the most common being simply “chocolate sheet cake”. But I don’t think that name does this cake justice—it speaks plain old chocolate to me (not that that's bad), but this is not just any old chocolate cake dumped into a sheet pan. Texas sheet cake is rich, moist, and chocolatey.

Texas sheet cake has a few defining characteristics which help make it so amazing: the most obvious are the use of chocolate and a sheet pan—but we already knew that much. Less obvious is that it usually has nuts (especially pecans) in the frosting, and buttermilk (or sometimes sour cream) in the cake; these give it crunch as well as fluffy-moistness. The light cake and dense frosting combine in two luscious layers to create one giant pan of goodness. "Texas sheet cake" is basically just another way of saying "indulgence".


Texas sheet cake is not only delicious to eat, but it is easy to make and feeds a crowd; no one goes home disappointed! The fact that nobody knows the exact origins of the cake is forgotten at the first bite.

Texas Sheet Cake
Serves: 24-30

Ingredients:
Cake:
2 cups flour
2 cups sugar
1/4 tsp. salt
4 Tbs. (heaping) cocoa
2 sticks butter (1 cup / 8 oz.)
1 cup boiling water
1/2 cup buttermilk
2 eggs, beaten
1 tsp. baking soda
1 tsp. vanilla

 Frosting:
1/2 cup finely chopped pecans (optional)
1 3/4 stick butter (14 Tbs. or 7 oz)
4 Tbs. (heaping) cocoa
6 Tbs. milk
1 teaspoon vanilla
about 7 1/2 cups (or 1 pound minus 1/2 cup) powdered sugar

Directions:
1. Preheat oven to 350 Fº. Grease a 18x13 jelly roll pan.
2. In a large mixing bowl, combine flour, sugar, and salt.
3. In a small pot, melt butter. Add cocoa powder and stir.
4. Carefully pour boiling water into cocoa mixture and allow mixture to boil for 30 seconds.
5. Remove from heat and add to flour mixture; stir.
6. Mix buttermilk, beaten eggs, baking soda, and vanilla together in a large measuring cup.
7. Add buttermilk mixture to flour and cocoa mixture. Stir until combined.
8. Pour into prepared pan. Bake for 20-25 minutes.
9. While cake is baking, make the icing.

Icing:
1. Chop pecans finely.
2. Melt butter in a large saucepan.
3. Stir in cocoa, then turn off heat.
4. Add the milk, vanilla, and powdered sugar; mix and stir in the pecans.
5. Pour over warm cake, spreading evenly with a plastic spatula.

Recipe from: http://thepioneerwoman.com/cooking/2007/06/the_best_chocol/

Saturday, August 23, 2014

Lemon Poppyseed Pancakes

First week of school — done.
And now, I get some gourmet pancakes to celebrate! Yay!


At the beginning of the summer a friend told me that she had made Joy the Baker's Lemon Poppyseed Pancakes and that they were really good. Thanks to the fact that my mom makes the best lemon poppyseed bread, I already knew that I loved the flavor in bread and would love it in pancakes too. I was all on board to make them myself (ignore the fact that it took me all summer to get to them).


What these pancakes lack in fluffiness, they make up for in flavor and texture — they are sweet, lemon poppy seed-y, lusciously soft, and ultimately delicious (especially with a little bit of Michigan maple syrup drizzled on top – these pancakes get only the best of the best!).

We did try adding blueberries and raspberries to some of them, but these pancakes did not need that. They were already too amazing.


A perfect treat for the first Saturday of the school year!

Lemon Poppy Seed Pancakes
Makes: about 24 small pancakes
Serves: 4

Ingredients:
2 Tbs. granulated sugar
2 Tbs. fresh lemon zest
2 cups all-purpose flour
2 tsp. baking powder
1 tsp. baking soda
1 tsp. salt
2 cups buttermilk*
2 large eggs
2 tsp. pure vanilla extract
2 Tbs. fresh lemon juice
4 Tbs. unsalted butter, melted
2 Tbs. poppy seeds
butter, shortening, or vegetable oil for frying
maple syrup for serving

Directions:
1. Combine granulated sugar and lemon zest in a small bowl; rub mixture together with your fingers until the sugar is fragrant. Set aside.
2. Whisk flour, baking powder, baking soda, and salt in a large bowl. Mix in lemon sugar. Set aside.
3. In a medium bowl or large measuring cup, whisk buttermilk, eggs, vanilla extract, lemon juice, and melted butter. 
4. All at once, pour wet ingredients into dry ingredients. Stir in the poppy seeds until combined. Batter should be slightly lumpy. Let the batter rest for 10 minutes while griddle heats.
5. Over medium heat place a griddle or nonstick sauté pan. Coat surface of pan with a little butter, shortening, or vegetable oil.
6. Dollop batter on hot pan — 2 tablespoons of batter for small pancakes or a 1/4 cup of batter for big pancakes. Cook until golden brown on the bottom and bubbling on the top. Flip and cook until golden brown.
7. To keep pancakes warm while others are cooking, transfer to an oven-proof plate and place in a warm oven (about 150ºF) until all the pancakes are ready
8. Serve with butter and maple syrup.

*If you have no buttermilk on hand, you can make it: put 1 tablespoon + 1 teaspoon of vinegar or lemon juice into a 2-cup measuring cup; top with 2 cups of milk, stir and let stand for 5 minutes.

Recipe from: http://joythebaker.com/2012/09/lemon-poppy-seed-pancakes/

Monday, August 18, 2014

Fresh Pasta

We went to the coolest store in Camogli... it was called Pasta Fresca (creative, right?). It was this place that made me really want to try to make my own pasta.
Behind the displays of different fresh pastas in the front, we could see a big room in the back where they made the pasta. There were piles and piles of noodles laying around. Bowls of homemade sauces were nestled between the differently shaped and colored fresh noodles. It was pick your pasta, pick your sauce, cook and eat. Simple and yummy!
There were so many interesting looking pastas – black squid ink noodles, pillowy gnocchi, stringy spaghetti, bulging cappelletti, perfectly filled ravioli, flat lasagna noodles, and some kind of pasta that looked like peas – I was sad that I couldn't try them all.


In the two times that we went to Pasta Fresca, we got gnocchi and cappelletti with marinara sauce, meat sauce, and pesto sauce. We took it home, cooked it up, and ate it beside some still-warm focaccia bread from the focacceria next door to the fresh pasta place. It was quick, easy, and absolutely delicious.
The gnocchi was a great consistency – nice and soft and creamy. It had a slightly sweet taste to it, so I liked it with the red sauces better than with the pesto. We make gnocchi at home sometimes, but are still working on perfecting that.
Cappelletti means 'alpine hats', and they do look a little like hats. Cappelletti is basically just ravioli in a different shape, and with more filling. Fillings include meat, cheese, or vegetables (we got vegetables). I liked the cappelletti with all of the sauces we got.
Pesto originates in the Liguria region of Italy (which Camogli is located in). I really liked Pasta Fresca's pesto – the basil wasn't ground too small like I saw in a lot of restaurants in Italy, and the flavor was delicious. It reminded me of my mom's pesto. I will say though, Pasta Fresca added a lot of olive oil to their pesto!
Focaccia bread also originates in Liguria. The focacceria we went to had a few different kinds, but we just got the plain one; it was so fresh, warm, and flavorful that it just melted in our mouths...let's just say we didn't miss all the extra toppings! It did, however, drip olive oil ceaselessly...those Italians love their olive oil.
The second time we went to Pasta Fresca, they didn't have the squid ink pasta so instead I had to get it at a restaurant later. It was fun to try and tasted good (there was actually no distinguishable difference in flavor between normal spaghetti and the squid ink spaghetti)!


In the fresh pasta store, they did have some different types of dried pasta on the shelves that looked very interesting. All different shapes and sizes, some (like simple, flat, disk-shaped ones) you just put some olive oil and seasonings on, or others (like the small grain-like ones) you put in soups.


When we got home we only waited a few weeks to try making fresh pasta because we were so anxious to see if we could make it just as good as the Italians...and ours was ONE THOUSAND times better than dried pasta! So, thank you Italy for inspiring me to make fresh pasta – and, for how good it is, it takes surprisingly few ingredients.


Just make a bowl of flour (literally).


Pour in some of your egg, water, salt, and olive oil mixture. Take two fingers and swirl it around, carefully mixing in the edges of the flour bowl little by little and adding more egg mixture.


Knead the dough and chill in the fridge.


Roll into sheets (this is a good work out) and cut into shapes – some easy ones are ravioli, fettucine, or tagliatelle.


Hang 'em up while you're busy so they don't stick together...we used a clothes rack, but anything works.


Boil for a couple minutes in water with a little olive oil, make some sauce, and you're ready to eat! A bonus of fresh pasta? It is much easier to get al dente (not crunchy, not soft, just firm) than dried pasta!


This method can be a little messy/time consuming/labour intensive, so there are some alternatives:
If you don't want to make a flour bowl, you can use a food processor.
You can use a pasta machine instead of rolling it by hand (in which case you have more options for shapes).
You can make a double batch and freeze some pasta for a quick meal later.


Maybe I should just start my own pasta store. I'm pretty sure it would be a big hit in America! All I would need are a few different pasta types, some sauce choices, some boxes, and a scale, just like Pasta Fresca...brilliantly simple and deliciously yummy.

Watch Alton Brown's video for more details on making fresh pasta...it's only 20 minutes and taught me so much!

Pasta
5 servings

Ingredients:
3 cups all-purpose flour
2 large eggs
3 Tbs. water
1 tsp. olive oil
1/2 tsp. salt

Directions :

By hand:
1. On a clean surface, make a well out of the flour; make sure the sides are sturdy.
2. In a small bowl, mix eggs, water, olive oil, and salt.
3. Slowly pour egg mixture into the well. Mix with two of your fingers. Gradually incorporate the sides of the flour well into the egg mixture. Continue mixing in flour until all of the egg mixture is used, but don't force the dough to take more flour.
4. Pasta machine: Make dough into a disk, wrap in plastic wrap, and chill in fridge for at least 1 hour.
5. By hand: Knead dough for 8-10 minutes on a floured surface. Make dough into a disk, wrap in plastic wrap, and chill in fridge for at least 1 hour.

By Food Processor:
1. In the bowl of your food processor combine the flour and salt and pulse 2 to 3 times.
2. In a small bowl, whisk eggs, water and oil.
3. Continuously pour egg mixture into flour while pulsing the food processor.
4. Continue pulsing the food processor until the dough begins to pull away from the sides of the bowl.
5. Follow above directions for hand rolling or machine rolling.

After chilling:

Machine rolling:
1. Follow manufacturer's instructions to create the shape of noodle you want.
2. Boil the fresh pasta according to the directions below or freeze it for later.

Hand rolling:
1. Take 1/4 of the chilled pasta dough and on a lightly floured surface use a rolling pin to roll dough out into a 1/8" thick sheet.
2. Use a pizza cutter to cut pasta into desired shape. Hang noodles up so that they do not stick while other pasta is being cut.
3. Boil the fresh pasta according to the directions below or freeze it for later.

After rolling:

Boiling:
1. Boil some water in a large pot. Add a little olive oil (about 2 Tbs.)
2. Gently drop fresh pasta into water and boil until pasta floats on surface of water and is al dente, about 2 minutes for fresh pasta or 3 minutes for frozen pasta.
3. Serve with sauce of your choice.

Recipe from: http://www.foodnetwork.com/recipes/alton-brown/ravioli-recipe.html?oc=linkback