Wednesday, February 25, 2015

Spaghetti Goo

I think I like spaghetti goo mostly because it’s fun to say.


Well, that and there’s spicy sausages in it (love!). However, times were not always so good. Way-back-when, our spaghetti goo was depressingly sausage-deficient. There were a few buried under the mass of noodles, but we all had to compete to be the first one to serve ourselves in order to get enough sausages.
Why didn’t we end this dark age by simply adding more sausages, you ask? Well, we did! And now, not only is our spaghetti goo no longer sausage-deficient, but we don’t have to use caveman manners.


So back to the name—why is it called spaghetti goo (besides that it is fun to say)?
First, it’s obviously mostly made up of spaghetti (and, now, sausages). Theeeeen we pour in lots of cheese, mix it up, and BAM! the spaghetti gets gooey. It’s spaghetti goo!


I’m not going to lie, my mom actually did most of the grunt work when we made this spaghetti goo. I just waltzed in, stirred some vegetables, strained some spaghetti, mixed in some cheese, put it all together, and (shamelessly) gobbled it down. Nevertheless, I enjoyed helping and taking pictures!


Spaghetti Goo

Ingredients:
1 package sausage (such as Eckrich pre-cooked breakfast links)*
1 tsp. butter
1 tsp. crushed garlic
1 small red onion, chopped
1 1/2 tsp. oregano
1 Tbs. parsley
1/2 tsp. salt
1 tsp. pepper
16 oz. mixed fresh or frozen vegetables (broccoli, cauliflower, carrots)
1 can sliced water chestnuts, drained
8-12 oz. spaghetti (about one box)
1 1/2 cup shredded cheddar cheese

Directions:
1. Slice sausages into bite-sized pieces.
2. Sauté sausages in butter and garlic. Add chopped onion, herbs and spices.
3. Add veggies and drained water chestnuts. Simmer until cooked.
4. Add spaghetti to veggie mixture. Add 1 cup cheese and sprinkle rest on top.
5. Put in 350ºF oven until cheese is melted, about 10 minutes.

*This is the amount of sausages that we use, but you may want to add more or less according to your sausage cravings.

Recipe from: Connie Petersen

Sunday, January 11, 2015

Alton Brown's Curry Chicken Pot Pie

Do you remember those little foil pie tins filled with frozen chicken pot pie, that you would just pop into the oven for about a half hour for an easy meal?

We used to love those things—that is, until we made Alton Brown's curry chicken pot pie. Then, after several years of only eating this homemade pot pie with not one frozen pie in sight, my sister and I tried the frozen pot pies again.
And I must say, bleh—as a result of those little frozen pies shining so bright in our memories, we expected too much out of them; they tasted pretty flavorless to our now-enlightened palates.


Curry chicken pot pie has been one of our go-to favorites ever since we discovered it, and there is enough for the whole family. However, this chicken pot pie is different from others in a few ways: 1. It is crustless except for the puff pastry that is laid on top of the vegetables and chicken—which makes it easier to make, and 2. It contains curry for a nice, different flavor.

Like I said, this pot pie is pretty easy to make.


Just cook some vegetables until they're nice and golden brown.


Make your curry sauce by sweating your onions and celery in butter and cooking out the water, adding flour and curry, whisking in milk and chicken broth, and adding some salt, pepper, and parsley for flavor.


Combine the sauce and vegetables in a casserole dish.


Spread on the puff pastry.


Cut a whale, a cupcake, and two cats out of the extra puff pastry.
Just kidding—only if you feel like it.


Bake until a beautiful golden brown.


Enjoy!

Alton Brown's Curry Chicken Pot Pie

Ingredients:
4 cups frozen vegetable mix (peas, carrots, corn)*
1 to 2 Tbs. canola oil
3 Tbs. butter
1 cup chopped onion
1 cup chopped celery
1 1/2 cups low sodium chicken broth
1/2 cup milk
Tbs. flour
tsp. curry powder
Tbs. dried parsley
1 tsp. salt
1/2 
tsp. fresh ground pepper
2 cups cubed cooked chicken
1 package puff pastry

1. Preheat oven to 400ºF.
2. Toss the frozen vegetables with canola oil to evenly coat; spread onto a jelly roll pan. Place under broiler on high until golden, about 3 minutes.
3. In a sauté pan, heat 1 tablespoon of butter, then add the onion and celery to sweat them.
4. In a small pot on medium heat, warm the chicken broth and milk.
5. To the celery mix, add 2 more tablespoons of butter; cook out the water. Add the flour and curry, cooking for 1 to 2 minutes.
6. Whisk the milk mixture into the celery mixture and cook until thickened.
7. Add parsley, salt, and pepper. Mix in the browned vegetables and the chicken.
8. Pour sauce mixture into a large casserole dish. Lay a sheet of puff pastry over top as a crust.
9. Cook in the oven for 25 minutes, until the puff pastry is golden brown and the sauce is hot and bubbly.

*Various other types of vegetables may also be used. If using fresh rather than frozen carrots, they will need to be chopped into small pieces about the same size as the other vegetables being used, and will need to be baked for about 10 minutes at 350ºF before being broiled with the other vegetables to avoid crunchiness.

Recipe from: Alton Brown, 
http://www.foodnetwork.com/recipes/alton-brown/curry-chicken-pot-pie-recipe.html

Saturday, January 10, 2015

Pigs in a Blanket

These were practically gold when I was little, so rare did we get them and so good did they taste.


There was a certain satisfaction in eating food with our hands—to pick up tasty little sausages wrapped in warm, buttery crescent rolls, and pop them into our little mouths, all the while thinking about what a nice name "pigs in a blanket" is.

Well, maybe if you really think about, it's not such a nice name (you're eating cute little piggies while they're sleeping?)—but at least it makes sense.


They were one of those foods that we rarely had, but all loved. I liked to help make them—popping open the tube of crescent rolls never got old—but I loved eating them. I always wished that I had room for more.


I remember one particular day that I didn't feel very well around dinner time, and therefore wasn't very hungry; I was devastated when I found out that we were eating pigs in a blanket for dinner—how was I supposed to be fully satisfied until next time we had them for dinner if I couldn't eat them now?
I solved the problem by eating as many as I wanted anyways.


We haven't had pigs in a blanket for years because of the lack of canned crescent dough overseas; however, this time we made our own crescent rolls. While they were good, I must say that canned crescent rolls are better. I need to keep looking for the perfect copycat recipe! Until then, if you are also unable to buy canned rolls, I suggest the recipe on Home Cooking Adventure, which is what we used.

Pigs in a Blanket
Makes: 8

Ingredients:
1 can (8 oz.) crescent rolls
8 breakfast sausage links

Directions:
1. Preheat oven to 375ºF. Grease a cookie sheet; set aside.
2. Cook sausages according to the package directions. Set aside.
3. Open the tube of crescent rolls and separate the triangles, laying them flat. Lay a sausage on the wide end of one of the triangles and roll the dough around it. Place rolled sausage on the prepared pan; be sure to put the pointy end of the crescent roll under the rolled sausage and touching the pan, so that the roll does not come unraveled. Repeat with remaining sausages.
4. Bake in the oven for about 10 minutes, until golden brown.
5. Serve plain, or dip in mustard or maple syrup.

Wednesday, January 7, 2015

Scones

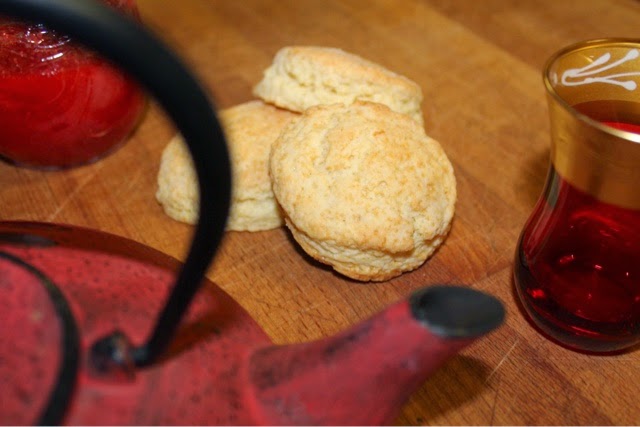
When I think of scones, I think of fine ladies wearing silk dresses and big hats while eating dainty snacks and drinking tea out of ornate china with their pinkies in the air. It is tea time in Britain (in the 1800s, of course).


Scones may seem very fancy, but don't worry, they are actually super easy to make. In fact, they are closely related to the American biscuit; both require similar ingredients and preparation methods. So what is the difference between the two?

Scones originated in Scotland, whereas biscuits are American.
Scones are slightly sweeter, and are eaten for breakfast or tea while biscuits are eaten with meals.
Scones may be flavored with various mix-ins, such as chocolate, cinnamon, or fruit and may be eaten with jam, butter, lemon curd, or cream; biscuits are usually eaten plain or may be used to soak up gravy.


If a scone is not made right, it can be dry, hard, and crumbly...yuck! But if a good recipe is used (like the one below, from Alton Brown), and they are not over mixed and nothing else crazy happens, they will have a crispy outside and a soft, flaky inside. They are absolutely delicious eaten warm, but they are good cold as well.


Scones
Makes: 12-16
Total time: 30 minutes

Ingredients:
2 cups flour
4 tsp. baking powder
3/4 tsp. salt
1/3 cup sugar
4 Tbs. cold butter
2 Tbs. shortening (or butter if no shortening is available)
3/4 cup cream
1 egg, beaten
1 handful of mix-ins (optional, e.g. chocolate chips or dried fruit)

Directions:
1. Heat oven to 375ºF. Grease a large baking sheet; set aside.
2. In a large mixing bowl, stir together flour, baking powder, salt and sugar until fully combined.
3. Cut in butter and shortening using a fork or a pastry cutter.
4. In a separate bowl, combine cream with beaten egg; add to dry ingredients. Stir in mix-ins, if used. Mix until just combined, being careful not to over-mix.
5. Place dough on a floured surface. With a floured rolling pin, roll dough into a 3/4 to 1 inch thick sheet. Cut into biscuit-sized rounds and place on prepared baking sheet.
6. Bake for 15 minutes or until the tops are golden brown. Cool on pan for 2 minutes before transferring to a wire rack to finish cooling.

Recipe from: Alton Brown, 
http://www.foodnetwork.com/recipes/alton-brown/scones-recipe.html
Scone history from: http://www.marthastewart.com/874314/marthas-column-scones

Sunday, January 4, 2015

Chicago-Style Deep Dish Pizza

We always make our pizza from scratch because there's just not that many other options in Russia. I try to make sure that we have a reasonably thick crust, but it comes no where near deep dish pizza in thickness or in flavor.
That's why when Elena and I both drooled over a new Chicago-style pizza recipe from one of my favorite bakers earlier this week, we decided that we needed to make it ASAP!


There are four types of pizza people, as I see it:

The thin crust people: You like your pizza thin and crunchy, just like the Italians.

The in-betweeners: You like your pizza not-too-thin, not-too-thick...why pick one when you can have both?

The thick crust people: You like thick, indulgent pizza that you can sink you teeth into—Chicago-style.

The pizza lovers: You like all kinds of pizza, and would rather die than have to choose one type over another.


This pizza is not for you thin crust people or you in-betweeners. No, no, this pizza is thick-as-can-be and super delicious in a buttery-kind-of-way. This is the kind of pizza that I like.
But then again, for me, flavor is the most important when talking about pizza; that's why I'm a pizza lover. I like pizza that has the best flavor, which just so happens to usually be deep dish pizza. But I can name a ton of other kinds of pizza that I like...just like I found out last summer that true Italian pizza (which is thin crust) is amazing.


When pizza came to the U.S., Americans Americanized it: added tons of toppings, thickened the dough...the list goes on, creating what we now think of as pizza. Now there are more varieties of pizza and more pizza lovers.

One of the much-loved ways that we've Americanized pizza is by creating Chicago-style deep dish pizza, which (obviously) originated in Chicago. This pizza's crust can be up to three inches high (meaning you have to eat it with a fork), and is delicious, buttery, and flaky. The pan is oiled so that the crust fries a little while the pizza is baking in the oven. Since the dough is so thick, deep dish pizza must be baked for a longer amount of time than regular pizza; this means that the toppings could be burnt. So, to solve this problem, the pizza is made in the order: dough, cheese, toppings, sauce.


When I told my siblings that we were supposed to put the sauce on top, they were completely opposed to the idea. I was barely able convince them to let me do it on the smallest pizza, but now I ask, did they really have that much say? They did not help me make the dough!
Half way through the baking time, I put tin foil on the pizzas that were not inverted so that when I pulled them out of the oven, perfectly golden cheese accompanied the delicious aroma.
When I bit into our inverted pizza, I discovered that I liked this strange new way of putting on the toppings! Using a fork, the pizza did not feel that much more messy even with the sauce on top; instead, the sauce prevented it from making me feel like I was getting an overload of cheese, like sometimes happens with pizza—rather, I was getting a nice combination of all the flavors.
All of that butter in the dough really made a difference: the crust was soft and flaky. We didn't oil the pans (we sprayed them with non-stick spray), but I would like to try oiling them next time to see if the crust will fry up a little bit.


I made a double recipe of the dough, and baked it all. We were left with one whole extra pizza (or about 1 1/2 9-inch pizzas, in terms of the recipe). Because the recipe is so well explained on Sally's Baking Addiction, I will not rewrite it here. Just click the link to get the recipe and awesome step-step photos!

http://sallysbakingaddiction.com/2014/12/31/how-to-make-chicago-style-deep-dish-pizza/

Thursday, December 25, 2014

Monkey Bread

Monkey bread is one of those breakfast foods that really screams 'dessert'...but everyone looks the other way when it's placed on the breakfast table because it's too good to pass up.


In case you don't know what monkey bread is, I'll just say now that it has nothing to do with monkeys: it is basically composed of balls of sweet dough dipped in butter, rolled in cinnamon-sugar, and baked in a bundt pan after being drenched in more butter and sugar.
This is why we only eat it once a year...
...only on that day that is so special and anything flies, including dessert for breakfast, do we eat monkey bread. Christmas Eve we roll the dough balls, and Christmas morning it is a simple thing to pour the butter and brown sugar glaze on and pop it in the oven while everyone gathers around the Christmas tree.


I don't remember when we first started having monkey bread every Christmas, but it's a Christmas tradition that I love now. When we were little, we used to jump on helping make the monkey bread. I loved popping open the cans of biscuits, extracting the squishy dough, and forming it into little round balls for someone to roll in the cinnamon-sugar. Then in the oven, the magic happened: the balls of dough poofed up and the cinnamon sugar (or so I thought—it was actually the brown sugar-butter mixture) became a caramely, sugary crust. I could barely wait until it cooled enough to eat, and as soon as possible I would tear off the pieces with the most caramelized sugar and pop them in my mouth. Years later, I still love making monkey bread—and now I have found the perfect recipe.


For the past several years we have lived in foreign countries, so we haven't been able to use the usual canned biscuits to make it a super simple meal. Instead, we used a sweet dough recipe—but I felt that the recipe could be even better. So this year, I jumped in before anyone could even blink, and suggested trying this recipe from Sally's Baking Addiction. Based on previous experience with her recipes, I knew that the monkey bread would come out good, but I didn't know just how incredibly finger-licking good it would turn out to be! (And finger-lick you must because monkey bread is too good to waste a bit—plus you don't want sticky gifts, do you?)
No matter how many pieces of monkey bread I eat (that's code for A LOT), there always seems to be enough for everyone and we end up with extras.


See? Plenty for my breakfast on boxing day (that's December 26 to you Americans).

Tearing pieces off, my family thought it was a little under-baked at 30 minutes—on the other hand, I just sank into my chair with a happy smile on my face; I thought that it was perfectly soft and delicious, melting in my mouth, mesmerizing me into taking more and more.


We skipped the glaze on our monkey bread because it was plenty rich and sugary without it! However, if used, the glaze would definitely make the monkey bread taste like (my idea of) the perfect cinnamon roll.

This monkey bread is a real treat—warm, sticky, and delicious, melting in your mouth in a perfect blend of cinnamon and sugar.

Monkey Bread
Serves: 6-7 people

Notes:
This recipe can be made using biscuits (I have not tested this, but it should work–please comment on this post about your experiences if you try this method with this recipe).
Replace the dough with 3 cans of buttermilk biscuits (non-flaky). Skip all rising of the dough. Open cans of biscuits and cut each round into quarters. Dip in butter (optional), coat in cinnamon-sugar, pour on topping, and bake; make and pour on vanilla glaze (optional).
The Pioneer Woman has a great recipe using biscuits.

Recipe adapted from: http://sallysbakingaddiction.com/2014/06/30/homemade-monkey-bread-aka-cinnamon-roll-bites/

Wednesday, December 3, 2014

Pink Peppermint Snowcaps

Even after eating way too much food on Thanksgiving (and afterwards, thank you leftovers), I was ready to get down to Christmas decorating on the weekend. Our four nativity scenes went up (yes, four, you read that right), the stockings were hung, the tree was trimmed—and while I was helping put up our favorite ornaments, I was also starting off the Christmas baking.


Peppermint is my favorite Christmas flavor—well, peppermint and chocolate, really. They were just made to go together. Maybe that’s why when someone says “Christmas cookies”, these Pink Peppermint Snowcaps are one of the first two cookies that come to mind (the others are Swedish pepparkokker). Of course, I can never remember their name and just end up trying to describe their yumminess instead, but ultimately failing to do them justice. Anyway, for as long as I can remember, at Christmastime these cookies have been around at my house.


I don’t know about you, but I like to lick the spatula spotless. And since these were peppermint cookies—and, as I have already explained, that is my favorite Christmas flavor—I was happily licking away at a spatula covered in pink, ooey-gooey, peppermint flavored yumminess, dancing away to Christmas music. But then I realized it.
You know what I’m talking about—IT. That cookies have raw eggs...usually this wouldn’t concern me (what’s two raw eggs if I only eat a spoonful of the batter?), but this was no normal cookie dough. This was raw MERINGUE, which is, in its very essence, raw eggs!!! After realizing this, I poked my tongue out for one last guilty little lick, then dutifully, but sorrowfully, put down the spatula.


A few days later, I’m still alive, but, even if I had died, death by peppermint cookie doesn’t sound too bad—I mean, it could have been worse (death by raw salmon? no thank you, Russia).

I’m glad I survived, though…it finally snowed this week! While Michigan has already had three snow days, Russia has barely had a flake of snow in the same time. Hopefully it won’t be a repeat of last year’s rather pathetic winter. After all, I’ve only ever thought of Russia as snowy – insanely snowy (before moving here, that is). Maybe Russia will live up to the stereotype this year!


In the meantime, you need to make these cookies—before you get buried in gift wrapping.

Pink Peppermint Snowcaps
Makes: 24

Ingredients:
2 egg whites
1/4 tsp. peppermint extract
1/8 tsp. cream of tartar
dash of salt
red or green food coloring*
3/4 cup granulated sugar
6 oz. chocolate chips

Directions:
1. Preheat oven to 225ºF. Prepare a baking sheet by covering with parchment paper.
2. Beat egg whites, peppermint, cream of tartar, and salt until soft peaks form.
3. Add food coloring until mixture turns the desired shade of pink or green.
4. Add sugar gradually, beating until stiff, glossy peaks form.
5. Gently fold in chocolate chips.
6. Transfer to a pastry bag and squeeze teaspoon-sized amounts of batter onto prepared baking sheet.
7. Bake for 1 1/2 hours, until dry but not brown. Turn oven off and allow meringues to remain in the closed oven for a few more hours until completely cool.

*gel food coloring is preferable—liquid food coloring works as well (about 7-8 drops), but it may cause the meringue to be liquidy, so that peaks will not form as well.