Saturday, September 27, 2014

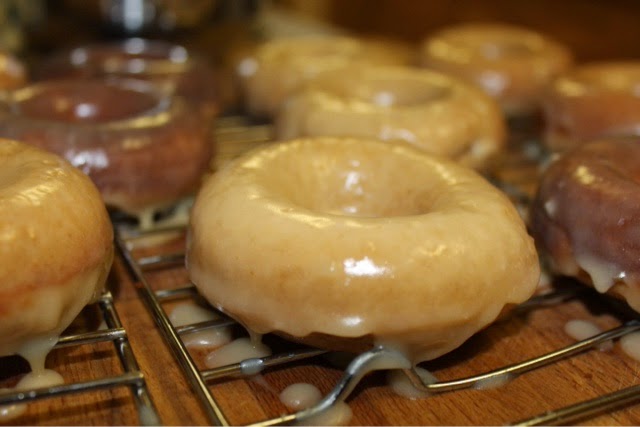
Spice Doughnuts with Brown Butter Glaze

Lately, it's been 60°F here in Moscow—fall seemed to come almost overnight, complete with a cold for me.
This horribly obnoxious cold started right at the beginning of the week, forcing me to suffer through five endless days of school with it. Within those five days, I had four tests, which meant that between sniffles, I had to quietly (and very awkwardly) blow my nose while avoiding eye contact with everyone in the otherwise silent room. Let's just say that it made for a long week, and I never thought the weekend would come. Miraculously, I was almost better by the time it did arrive, so then I could enjoy it by making us some fall donuts!


I think cats also know when fall has come. After keeping me warm during the night by cuddling with me, Kamber also kept me company in the kitchen, weaving in and out of my legs, tripping me up, begging for attention. Later as Mom was eating her fresh donuts on the couch, Kamber nosed her way onto Mom's lap. Kamber really seemed to want a bite of fall and some warmth!


These donuts have a cozy aroma...one bite of these and you'll get a mouthful of fall spices: cinnamon, allspice, ginger, and nutmeg. A yummy treat for a cold morning!

Spice Doughnuts with Brown Butter Glaze
Time: 35 minutes
Makes: 15 donuts

Recipe from: http://tutti-dolci.com/2014/09/spice-doughnuts-with-brown-butter-glaze/

Friday, September 12, 2014

Texas Sheet Cake

The first time I bit into a chocolatey square of Texas sheet cake years ago, I knew that someday I would have to make it myself. It sat in the back of my mind until I finally discovered that the Pioneer Woman has a recipe for it...I was so delighted that I made it almost immediately! All of her recipes are delicious…and usually pretty unhealthy too, and this one is no exception. However, this cake's heavenly flavor makes all that extra butter and sugar worth it.


The mystery behind Texas sheet cake: its name. People keep asking me, “why Texas?”.

The answer: I don’t know. Even wikipedia couldn’t tell me. *shakes head in disappointment*

I did find out, however, that this cake was quite popular in the South in the 1950s (no wonder there’s so much butter and sugar!). It actually has quite a few different names, one of the most common being simply “chocolate sheet cake”. But I don’t think that name does this cake justice—it speaks plain old chocolate to me (not that that's bad), but this is not just any old chocolate cake dumped into a sheet pan. Texas sheet cake is rich, moist, and chocolatey.

Texas sheet cake has a few defining characteristics which help make it so amazing: the most obvious are the use of chocolate and a sheet pan—but we already knew that much. Less obvious is that it usually has nuts (especially pecans) in the frosting, and buttermilk (or sometimes sour cream) in the cake; these give it crunch as well as fluffy-moistness. The light cake and dense frosting combine in two luscious layers to create one giant pan of goodness. "Texas sheet cake" is basically just another way of saying "indulgence".


Texas sheet cake is not only delicious to eat, but it is easy to make and feeds a crowd; no one goes home disappointed! The fact that nobody knows the exact origins of the cake is forgotten at the first bite.

Texas Sheet Cake
Serves: 24-30

Ingredients:
Cake:
2 cups flour
2 cups sugar
1/4 tsp. salt
4 Tbs. (heaping) cocoa
2 sticks butter (1 cup / 8 oz.)
1 cup boiling water
1/2 cup buttermilk
2 eggs, beaten
1 tsp. baking soda
1 tsp. vanilla

 Frosting:
1/2 cup finely chopped pecans (optional)
1 3/4 stick butter (14 Tbs. or 7 oz)
4 Tbs. (heaping) cocoa
6 Tbs. milk
1 teaspoon vanilla
about 7 1/2 cups (or 1 pound minus 1/2 cup) powdered sugar

Directions:
1. Preheat oven to 350 Fº. Grease a 18x13 jelly roll pan.
2. In a large mixing bowl, combine flour, sugar, and salt.
3. In a small pot, melt butter. Add cocoa powder and stir.
4. Carefully pour boiling water into cocoa mixture and allow mixture to boil for 30 seconds.
5. Remove from heat and add to flour mixture; stir.
6. Mix buttermilk, beaten eggs, baking soda, and vanilla together in a large measuring cup.
7. Add buttermilk mixture to flour and cocoa mixture. Stir until combined.
8. Pour into prepared pan. Bake for 20-25 minutes.
9. While cake is baking, make the icing.

Icing:
1. Chop pecans finely.
2. Melt butter in a large saucepan.
3. Stir in cocoa, then turn off heat.
4. Add the milk, vanilla, and powdered sugar; mix and stir in the pecans.
5. Pour over warm cake, spreading evenly with a plastic spatula.

Recipe from: http://thepioneerwoman.com/cooking/2007/06/the_best_chocol/

Saturday, August 23, 2014

Lemon Poppyseed Pancakes

First week of school — done.
And now, I get some gourmet pancakes to celebrate! Yay!


At the beginning of the summer a friend told me that she had made Joy the Baker's Lemon Poppyseed Pancakes and that they were really good. Thanks to the fact that my mom makes the best lemon poppyseed bread, I already knew that I loved the flavor in bread and would love it in pancakes too. I was all on board to make them myself (ignore the fact that it took me all summer to get to them).


What these pancakes lack in fluffiness, they make up for in flavor and texture — they are sweet, lemon poppy seed-y, lusciously soft, and ultimately delicious (especially with a little bit of Michigan maple syrup drizzled on top – these pancakes get only the best of the best!).

We did try adding blueberries and raspberries to some of them, but these pancakes did not need that. They were already too amazing.


A perfect treat for the first Saturday of the school year!

Lemon Poppy Seed Pancakes
Makes: about 24 small pancakes
Serves: 4

Ingredients:
2 Tbs. granulated sugar
2 Tbs. fresh lemon zest
2 cups all-purpose flour
2 tsp. baking powder
1 tsp. baking soda
1 tsp. salt
2 cups buttermilk*
2 large eggs
2 tsp. pure vanilla extract
2 Tbs. fresh lemon juice
4 Tbs. unsalted butter, melted
2 Tbs. poppy seeds
butter, shortening, or vegetable oil for frying
maple syrup for serving

Directions:
1. Combine granulated sugar and lemon zest in a small bowl; rub mixture together with your fingers until the sugar is fragrant. Set aside.
2. Whisk flour, baking powder, baking soda, and salt in a large bowl. Mix in lemon sugar. Set aside.
3. In a medium bowl or large measuring cup, whisk buttermilk, eggs, vanilla extract, lemon juice, and melted butter. 
4. All at once, pour wet ingredients into dry ingredients. Stir in the poppy seeds until combined. Batter should be slightly lumpy. Let the batter rest for 10 minutes while griddle heats.
5. Over medium heat place a griddle or nonstick sauté pan. Coat surface of pan with a little butter, shortening, or vegetable oil.
6. Dollop batter on hot pan — 2 tablespoons of batter for small pancakes or a 1/4 cup of batter for big pancakes. Cook until golden brown on the bottom and bubbling on the top. Flip and cook until golden brown.
7. To keep pancakes warm while others are cooking, transfer to an oven-proof plate and place in a warm oven (about 150ºF) until all the pancakes are ready
8. Serve with butter and maple syrup.

*If you have no buttermilk on hand, you can make it: put 1 tablespoon + 1 teaspoon of vinegar or lemon juice into a 2-cup measuring cup; top with 2 cups of milk, stir and let stand for 5 minutes.

Recipe from: http://joythebaker.com/2012/09/lemon-poppy-seed-pancakes/

Monday, August 18, 2014

Fresh Pasta

We went to the coolest store in Camogli... it was called Pasta Fresca (creative, right?). It was this place that made me really want to try to make my own pasta.
Behind the displays of different fresh pastas in the front, we could see a big room in the back where they made the pasta. There were piles and piles of noodles laying around. Bowls of homemade sauces were nestled between the differently shaped and colored fresh noodles. It was pick your pasta, pick your sauce, cook and eat. Simple and yummy!
There were so many interesting looking pastas – black squid ink noodles, pillowy gnocchi, stringy spaghetti, bulging cappelletti, perfectly filled ravioli, flat lasagna noodles, and some kind of pasta that looked like peas – I was sad that I couldn't try them all.


In the two times that we went to Pasta Fresca, we got gnocchi and cappelletti with marinara sauce, meat sauce, and pesto sauce. We took it home, cooked it up, and ate it beside some still-warm focaccia bread from the focacceria next door to the fresh pasta place. It was quick, easy, and absolutely delicious.
The gnocchi was a great consistency – nice and soft and creamy. It had a slightly sweet taste to it, so I liked it with the red sauces better than with the pesto. We make gnocchi at home sometimes, but are still working on perfecting that.
Cappelletti means 'alpine hats', and they do look a little like hats. Cappelletti is basically just ravioli in a different shape, and with more filling. Fillings include meat, cheese, or vegetables (we got vegetables). I liked the cappelletti with all of the sauces we got.
Pesto originates in the Liguria region of Italy (which Camogli is located in). I really liked Pasta Fresca's pesto – the basil wasn't ground too small like I saw in a lot of restaurants in Italy, and the flavor was delicious. It reminded me of my mom's pesto. I will say though, Pasta Fresca added a lot of olive oil to their pesto!
Focaccia bread also originates in Liguria. The focacceria we went to had a few different kinds, but we just got the plain one; it was so fresh, warm, and flavorful that it just melted in our mouths...let's just say we didn't miss all the extra toppings! It did, however, drip olive oil ceaselessly...those Italians love their olive oil.
The second time we went to Pasta Fresca, they didn't have the squid ink pasta so instead I had to get it at a restaurant later. It was fun to try and tasted good (there was actually no distinguishable difference in flavor between normal spaghetti and the squid ink spaghetti)!


In the fresh pasta store, they did have some different types of dried pasta on the shelves that looked very interesting. All different shapes and sizes, some (like simple, flat, disk-shaped ones) you just put some olive oil and seasonings on, or others (like the small grain-like ones) you put in soups.


When we got home we only waited a few weeks to try making fresh pasta because we were so anxious to see if we could make it just as good as the Italians...and ours was ONE THOUSAND times better than dried pasta! So, thank you Italy for inspiring me to make fresh pasta – and, for how good it is, it takes surprisingly few ingredients.


Just make a bowl of flour (literally).


Pour in some of your egg, water, salt, and olive oil mixture. Take two fingers and swirl it around, carefully mixing in the edges of the flour bowl little by little and adding more egg mixture.


Knead the dough and chill in the fridge.


Roll into sheets (this is a good work out) and cut into shapes – some easy ones are ravioli, fettucine, or tagliatelle.


Hang 'em up while you're busy so they don't stick together...we used a clothes rack, but anything works.


Boil for a couple minutes in water with a little olive oil, make some sauce, and you're ready to eat! A bonus of fresh pasta? It is much easier to get al dente (not crunchy, not soft, just firm) than dried pasta!


This method can be a little messy/time consuming/labour intensive, so there are some alternatives:
If you don't want to make a flour bowl, you can use a food processor.
You can use a pasta machine instead of rolling it by hand (in which case you have more options for shapes).
You can make a double batch and freeze some pasta for a quick meal later.


Maybe I should just start my own pasta store. I'm pretty sure it would be a big hit in America! All I would need are a few different pasta types, some sauce choices, some boxes, and a scale, just like Pasta Fresca...brilliantly simple and deliciously yummy.

Watch Alton Brown's video for more details on making fresh pasta...it's only 20 minutes and taught me so much!

Pasta
5 servings

Ingredients:
3 cups all-purpose flour
2 large eggs
3 Tbs. water
1 tsp. olive oil
1/2 tsp. salt

Directions :

By hand:
1. On a clean surface, make a well out of the flour; make sure the sides are sturdy.
2. In a small bowl, mix eggs, water, olive oil, and salt.
3. Slowly pour egg mixture into the well. Mix with two of your fingers. Gradually incorporate the sides of the flour well into the egg mixture. Continue mixing in flour until all of the egg mixture is used, but don't force the dough to take more flour.
4. Pasta machine: Make dough into a disk, wrap in plastic wrap, and chill in fridge for at least 1 hour.
5. By hand: Knead dough for 8-10 minutes on a floured surface. Make dough into a disk, wrap in plastic wrap, and chill in fridge for at least 1 hour.

By Food Processor:
1. In the bowl of your food processor combine the flour and salt and pulse 2 to 3 times.
2. In a small bowl, whisk eggs, water and oil.
3. Continuously pour egg mixture into flour while pulsing the food processor.
4. Continue pulsing the food processor until the dough begins to pull away from the sides of the bowl.
5. Follow above directions for hand rolling or machine rolling.

After chilling:

Machine rolling:
1. Follow manufacturer's instructions to create the shape of noodle you want.
2. Boil the fresh pasta according to the directions below or freeze it for later.

Hand rolling:
1. Take 1/4 of the chilled pasta dough and on a lightly floured surface use a rolling pin to roll dough out into a 1/8" thick sheet.
2. Use a pizza cutter to cut pasta into desired shape. Hang noodles up so that they do not stick while other pasta is being cut.
3. Boil the fresh pasta according to the directions below or freeze it for later.

After rolling:

Boiling:
1. Boil some water in a large pot. Add a little olive oil (about 2 Tbs.)
2. Gently drop fresh pasta into water and boil until pasta floats on surface of water and is al dente, about 2 minutes for fresh pasta or 3 minutes for frozen pasta.
3. Serve with sauce of your choice.

Recipe from: http://www.foodnetwork.com/recipes/alton-brown/ravioli-recipe.html?oc=linkback
Sunday, August 10, 2014

Chocolate Ice Cream Sandwich Cookies

I have a problem with thieves. Dessert thieves, to be exact. And some of the desserts stolen aren't even finished being made! This isn't a new thing, either.


First it was Olive Garden breadsticks (yes, I know, not dessert, but still stolen), then donuts, then chocolate cupcakes – and now three chocolate cookies that were destined to become ice cream sandwiches, stolen from the counter that I thought we had made clear was the no-eating counter.
Apparently not.


I suppose this says something about how good the food is, but I would rather not have my plans tangled with.
This time, however, the thief was not my brother. It was my dad. I can see why he couldn't stop at one cookie...these cookies are crunchy with a rich chocolate flavor. Even so, they are better with ice cream! And I would have had 24 of these delicious sandwiches and a cookie for Dad to eat, but instead we are left with 23 sandwiches, some extra ice cream, and a thief.


Although time consuming, these ice cream sandwiches are a real treat! If you don't have much time (or an ice cream maker) you can also use store bought ice cream.
We sandwiched homemade mint chcolate chip ice cream between the cookies, and it was a great choice! The crunchiness of the chocolate cookies and chocolate chips together with the minty creaminess of the ice cream blended to create the perfect sandwich!

With one week left until school starts, these are the perfect summer treat (though a little difficult to eat because of the crispness of the cookies)!


Chocolate Ice Cream Sandwich Cookies
Makes: 24 2-inch diameter sandwiches

Ingredients:

Chocolate Cookies:
12 Tbs. butter, room temperature
1 cup granulated sugar
2/3 cup dark cocoa powder
1 large egg
1 1/2 tsp. vanilla extract
1 1/4 cups all purpose flour
Extra flour and cocoa for dusting

Ice cream:
2 quarts ice cream (homemade or store bought)

Directions:

Ice Cream:
1. Line a 9 x 13" pan with plastic wrap. Spread softened ice cream evenly in pan, then cover with more plastic wrap. Freeze for at least 12 hours.

Chocolate Cookies:
1. Cream together the butter and sugar in the bowl of an electric mixer on medium speed until light and fluffy, about 3 minutes.
2. Add the cocoa powder and reduce speed to low, scraping down the sides of the bowl as needed.
3. On medium speed, beat in the vanilla and egg.
4. Mix in the flour on low speed until well combined.
5. Wrap cookie dough in plastic wrap. Chill for at least 4 hours.
6. When ready to bake, preheat the oven to 350ºF.
7. In a small bowl, make a mixture of enough cocoa powder and flour (50/50) to dust the surface of the counter to prevent sticking (the cocoa powder will keep the cookies dark brown once baked).
8. Remove dough from refrigerator; if it is rock hard, allow it to warm up a little bit. Roll out dough until about 1/8" thick. Cut into desired shapes; the cookie cutter used to cut the cookies will also be used to cut the ice cream.
9. Place cookies on a parchment paper or silpat-lined cookie sheet. The cookies do not spread much in the oven so do not worry about crowding them. Bake for 10-12 minutes.
10. Cool cookies completely on wire racks before assembling the ice cream sandwiches.

Ice Cream Sandwich Assembly:
1. Remove ice cream from freezer and allow to soften for 5 minutes. Remove the top layer of plastic wrap.
2. Using the same cookie cutter as used for the cookies, cut out the ice cream, and use a spoon to remove it from the pan if needed. Sandwich the ice cream between two cookies.
3. Return sandwiches to freezer until firm, then eat.

Recipe from: http://notsohumblepie.blogspot.ru/2010/04/perfect-ice-cream-sandwich.html

Friday, August 1, 2014

Chocolate Chip Muffins

Not gonna lie, I'm always a little suspicious of muffin recipes. Is the 'muffin' they advertise really just a cupcake disguised as a muffin? I mean, nothing against cupcakes, but if I wanted a cupcake, I would make one. And if it does turn out to be a muffin, is a bakery style muffin? As in one with a big, crusty top, thick, moist, not too sweet, and with add-ins or streusel? Because that's my kind of muffin – a real muffin.


But I am proud to announce that these muffins are muffins...even though the original pictures looked a little cupcake-y for my tastes. And I probably shouldn't be saying that because my pictures look a little cupcake-y. But in my defense, it was the cupcake liners' fault!

This week I decided that I needed to make something with these cute cupcake papers ASAP because I got them in IKEA a few months back. I know, that's a long time ago, but I forgot.
My choices to make with the papers were: cupcakes or muffins. Now, I couldn't make cupcakes because I was just in the process of decorating cupcakes for an order (and there were extras for us), so it had to be muffins. Plus it was breakfast time when I went through all this.


But you see, this is where the problem with the muffin tops comes in. These papers are not normal – they are a different shape (narrow but tall), which is why I wanted to test them.

Turns out the papers work great! They peel away sooo nicely from the muffins (although, that could be another good quality on the muffins' part...I hate it when I have to nibble the papers like a dog to get the half of my muffin that is stuck there).


So since the papers were narrower and taller than normal, they didn't fit in the pan quite right...and the batter just kept pushing the cupcake paper sides out...and out...and out...until I ran out of batter but the papers weren't filled to the tops. I could see that the muffins would have had big, beautiful muffin tops had I just made less muffins and filled the papers higher, but it was too late. My only reconciliation was that the tops were still sparkly...I sprinkled some vanilla sugar from Sweden on the tops. Yum!


So you see? These muffins are true muffins if you fill the papers to the tops. And when you eat the muffins, you will discover that they are delicious...not very crumbly, and still moist with the perfect amount of chocolate chips. They are not cupcakes – and I should know because I had one for lunch. They are substantial, sort of like waffles. I should know that too because I had one for dinner. It's summer right?


In case you're wondering about the funny way the muffins bake, baking these at a very high temperature first then lowering it makes the muffins dome nicely. Also, the ginormous amount of baking powder keeps the muffins fluffy, and using buttermilk makes them moist. This muffin batter comes together really fast – but don't try to go too fast and use an electric mixer. Muffin batter is delicate and an electric mixer will produce rock hard muffins.

Chocolate Chip Muffins
Makes: 6 jumbo, 15 standard, or 30 mini muffins (baking times differ)

Ingredients:
3 cups all-purpose flour (do not overmeasure)
4 tsp. baking powder
1/2 tsp. salt
1 tsp. ground cinnamon
1/4 tsp. ground nutmeg
2 eggs, room temperature
1 cup granulated sugar
1 cup buttermilk* 
1/2 cup canola oil (or vegetable oil/melted coconut oil)
1 tsp. vanilla extract
1 1/2 cups chocolate chips (semi-sweet chocolate, chocolate chunks, dark chocolate, or milk chocolate)
coarse sugar for sprinkling (optional)

Directions:
1. Preheat oven to 425ºF degrees. Line muffin tins with cupcake papers or spray with non-stick spray.
2. In a large bowl, use a spatula to mix flour, baking powder, salt, cinnamon, and nutmeg until combined. Set aside.
3. Mix eggs and sugar together in a medium bowl. Add milk, oil, and vanilla and mix until combined into a pale yellow batter.
4. Using a wooden spoon, fold wet ingredients into dry ingredients, being careful not to over-mix. Be sure to scrape dry ingredients from bottom of bowl and mix until no pockets of flour remain – the batter will be thick and lumpy.
5. Fold in chocolate chips.
6. Fill muffin cups all the way. Sprinkle sugar on top if desired.
7. For jumbo muffins: Bake at 425ºF degrees for 5 minutes. Reduce oven temperature to 375ºF and bake for 25-26 minutes more, until lightly golden and the tops are set.
For standard muffins: Bake at 425ºF degrees for 5 minutes. Reduce oven temperature to 375ºF and bake for 13-14 minutes more, until lightly golden and the tops are set.
For mini muffins: Bake at 375ºF degrees for 11-12 minutes, until lightly golden and the tops are set.
8. Cool in pans for 10 minutes then transfer to a wire rack to cool completely. Eat with butter, jam, or peanut butter. Muffins taste best the same day. Store in an airtight container at room temperature for up to 5 days. Freeze for up to 3 months.

*Buttermilk produces the moistest texture. For easy homemade buttermilk: 1 cup milk + 1 Tbs. vinegar OR lemon juice. Let sit for 5 minutes before using.

Recipe from: http://sallysbakingaddiction.com/2013/01/17/bakery-style-chocolate-chip-muffins/

Wednesday, July 30, 2014

Sweet and Sour Chicken

There's really only two things I actually order at Chinese restaurants.


Sweet and sour chicken and fried rice are a must any time I eat Chinese, and they're even better together...which means that I can gobble down even more food – and trust me, when I'm at a Chinese restaurant, I make sure I fill my stomach all the way. There is just no excuse to waste good Chinese food. And if I happen to want something else? Well then I just nibble off of my family's plates. Families are helpful that way.

Since Chinese food is so good, we've eaten at Chinese restaurants in many places we've been.
In New Zealand, we had a small take-out place with a couple of Chinese people cooking the food right in front of you. We would sit outside and wait while the cooks made some "Chick-Fwie-Wie" for us. Then we would carry our little Chinese containers back to the house, trying to imitate their exotic accent.
In Michigan, my favorite is "that one Chinese place with the mints" in Midland...I've never bothered to learn the actual name, everyone knows what I'm talking about anyways, right? At the end of the meal when leaving the restaurant, we would always grab a handful of their strangely delicious colorful mints. Of course, the actual Chinese food tasted great too, but I always remember that restaurant by their little mints.
In Washington, D.C. we visited Chinatown one day. We were walking down one of the streets, looking for a place to eat when we saw a Chinese restaurant's sign advertising lobster – not my cup of tea. I protested in vain. We went in, looked at the menu, and I was pleasantly surprised to find my favorites...and even more surprised when I discovered that they tasted really good. What do you know but the next time (or two) we visited D.C. I made sure that we went to the same restaurant.
On the other hand, here in Moscow we have not found a Chinese restaurant. Even if we did find one, it probably would be on the more expensive side, like all the restaurants here. But whether there are Chinese restaurants here or not, I suffer no longer. I have found a recipe online from a Chinese lady – and the sauce tastes exactly like sweet and sour sauce from a restaurant (except without the fake bright red look to it)!


First, make the marinade...bonus points for finding a bottle of dry white wine with your last name on it!


Then marinade your chicken. Mix it up good so every bite has delicious flavor! (Does anyone else question the actual impact on our tastebuds of those giant pieces of ginger root?)


Make some breadcrumbs...but maybe a little smaller than ours.


And bread the chicken. The use of fingers is acceptable here.


Fry the chicken!


Let the chicken drain – no need for extra oil. A pizza pan with holes in the bottom works great for this.


Taste the sauce lots, while no one is looking...I promise it is amazing!


Don't forget the rice – it's pretty important. And maybe make a salad while you're at it to balance out all that fried chicken...that is, if you can resist the amazing smells long enough to throw some leaves on a plate!

Sweet and Sour Chicken
Serves: 6

Marinade and chicken:
2 1/2 pounds boneless, skinless chicken thighs, cut into bite-size pieces
1 Tbs. low-sodium soy sauce
2 thin slices unpeeled ginger root
2 Tbs. dry white wine
2 1/4 cups fresh bread crumbs (preferably from stale French bread)*
4 cups canola oil, for frying

Sauce:
2 Tbs. canola oil
2 medium cloves garlic, smashed and minced (scant tablespoon)
2 thin slices peeled ginger root, cut into matchsticks then finely chopped (1 tablespoon)
1/2 medium onion, diced into 1-inch pieces (about 1/2 cup)
1/2 large red bell pepper, stemmed, seeded and cut into 1-inch pieces
2 cups water, plus more for the cornstarch slurry
Half of a 20-ounce can of pineapple slices, cut into bite-size pieces, plus half the juice from the can*
3 to 4 Tbs. ketchup
3/4 to 1 cup sugar
2/3 cup seasoned rice vinegar*
2 Tbs. cornstarch (or more for thicker sauce)

Steamed rice, for serving

Directions:
1. Marinade and chicken: In a bowl or resealable plastic bag, combine the chicken, soy sauce, ginger and white wine; marinate overnight in the refrigerator.
2. Use several layers of paper towels to line a colander for placing fried chicken in.
3. Pour oil into a large sauté pan or wok and heat to 250ºF over medium heat.
4. While oil heats, place the bread crumbs in a wide bowl. Toss 4 or 5 pieces of chicken at a time in the breadcrumbs, coating evenly. Fry for 1 1/2 to 2 minutes until golden brown, crisped, and cooked through. Use a slotted spoon to remove chicken to the paper towel-lined colander. Repeat with remaining chicken.
5. Set aside the remaining marinade (there will not be much). Discard ginger slices.
6. Sauce: In a small saucepan over medium-high heat, heat the oil.
7. Add the garlic and ginger just when it starts to simmer. Fry until just fragrant, stirring a little; do not burn the garlic.
8. Add the onion and red bell pepper. Stir to coat with oil. Cook for 1 to 2 minutes (do not let the onions take on color).
9. Then add the marinade, the 2 cups of water, and the pineapple and its juices.
10. Let the mixture come to a boil before adding 3 Tbs. ketchup, 3/4 cup sugar, and the vinegar. Stir. Taste and add more ketchup or sugar if needed.
11. In a small bowl, mix the cornstarch with about 1/2 tablespoon of water to form a slurry. It should be a little pasty, not too liquidy (if there is too much water, it will not make the sauce much thicker. If there is too little water, the sauce will have clumps of cornstarch in it). Pour slowly into the sauce and stir. It should thicken quickly. If you want the sauce thicker, repeat with more cornstarch. If the sauce will not thicken, add some of the sauce's own liquid to the cornstarch instead of extra water.
12. Serve chicken and sauce on top of rice immediately. If you would like to save the extras, keep the chicken and the sauce separate to avoid the chicken becoming soggy.

*We did not have (nor have use for the extras from) a 20-ounce can of pineapple. Instead we used one 8-ounce can of crushed pineapple. We also used 3 Tbs. of ketchup and 3/4 cup of sugar, and the flavors were perfect.

*We did not have seasoned rice vinegar. Instead we used 1/3 cup white vinegar, plus a half of a 1/3 cup and the rest of that 1/3 filled with water.

*The breadcrumbs will be fried, so they do not need to be baked beforehand. Simply put bread (stale bread or end pieces work well for this) in a food processor and pulse until the bread becomes small crumbs, but not too fine.

Recipe from: http://www.washingtonpost.com/blogs/all-we-can-eat/post/the-best-sweet-and-sour-chicken-period/2012/06/13/gJQAZ0ntaV_blog.html